For a software engineer, UserScripts are awesome because numerous tools, such as agile boards, code review tools and build pipelines that engineers use daily are now web based and you can now extend the functionality of these web pages through simple scripts, thus saving time and improving productivity.
For this tutorial, I’m assuming you have either Greasemonkey or Tampermonkey installed in your browser of choice. I’m using Chrome with Tampermonkey, but any major browser with either plugins will work. Also, you’ll find that “Greasemonkey scripts” are sometimes called “User scripts” on the internet. These terms are used interchangeably and mean the same thing.
To illustrate the simplicity of creating a useful Greasemonkey script, let’s say I love exploring new GitHub projects. Although each repository has a short blurb about the project underneath the project name, I don’t want to have to click into every single repository to learn more about it. Perhaps there is a more efficient way to get more information about the repository.
I want to be able to mouse over one of the explore tiles (we’ll call these tiles “Story tiles” from now on… you’ll see why later) at github.com/explore and have a on-screen modal show me more information about the repository. To be able to do this, we’ll need to do a list of things using Greasemonkey/Javascript:
- Create and attach a modal to the body element of the page. This is where we’ll display data about a repository
- Attach an event handler to a “Story” so that when we mouse over, data will displayed in the modal we created
- Pull and display some information about a given repository using the GitHub API.
I chose this as an example project because most Greasemonkey scripts often boil down to the three steps mentioned above (i.e. creating custom DOM elements, attaching JavaScript event handlers to the DOM and pulling/displaying data from an API).
You can download the script we’re about to create here.
The Metadata Block
Every Greasemonkey script starts with a header with some meta data about the script called the metadata block. You can find out what each parameter does in the Greasemonkey wiki.
 1// ==UserScript==
 2// @name Github Explorer
 3// @namespace http://matthewkuo.com
 4// @version 0.1
 5// @description Shows the README file of a github repository
 6// @match https://github.com/explore
 7// @require https://code.jquery.com/jquery-3.3.1.min.js
 8// ==/UserScript==
 9
10alert('Hello World');
Paste this block into the very top of your script. The @match parameter tells Greasemonkey on which pages you want your script to execute. The @require parameter allows you to provide other files or libraries that your script relies on. We’ll be using jQuery for this project to reduce boilerplate code, but you’re welcome to use any library or none at all.
Go to the Github explore page and you should see the “Hello World” alert. Congrats! Your script is working. Remove the alert from your script.
Creating the Data Modal
First off, we want to create an HTML element in which we’re going to append to the page’s body element using JavaScript. We’ll also add styling using CSS injected into the page through JavaScript. This is probably the nastiest part about using Greasemonkey as you’ll essentially be writing CSS and HTML code within JavaScript. I typically test out my HTML/CSS code in another file before pasting it into my script.
Creating HTML elements
 1(function() {
 2
 3let $body = $('body');
 4let $modal = $('<div id="modal"><div id="close-modal"><span>X</span></div><div id="modal-content"></div></div>');
 5// The "X" button to close our modal
 6let $close = $modal.find('#close-modal');
 7// div element to display our data
 8let $modalContent = $modal.find('#modal-content');
 9
10init()
11
12function init() {
13    $body.append($modal);
14}
15
16})();
The above code creates a modal with an “X” to close the modal and another div element to present the README. In the init() method we append the modal to the page’s body element.
NOTE: Wrapping your code in an immediately invoked function expression is a good idea as it prevents your script from polluting the global namespace and breaking other functionalities of the website that you didn’t intend.
Injecting custom CSS
To style our new modal with CSS, we’ll need to attach create a style element in which we inject into the head element of the page. We could also modify each element’s style property in JavaScript, but that’s a lot more cumbersome. A cleaner way would be to upload your CSS file somewhere and then @require it in your metablock – but that’s out of the scope of this tutorial.
 1//...
 2
 3function init() {
 4    $body.append($modal);
 5    setupCss('#modal{display:none;position:fixed;width:100%;bottom:0;left:0;right:0;background:white;padding:10px;max-height:20vw;overflow-y:scroll;border-top:1px solid grey}#close-modal{position:fixed;right:30px}');
 6}
 7
 8function setupCss(css) {
 9    let head = $('head');
10    let style = document.createElement('style');
11    style.setAttribute('type', 'text/css');
12    style.textContent = css;
13    head.append(style);
14}
15
16//...
Our setupCss() function takes a CSS string and creates a style element in which we inject into the head of the page. The actual CSS is out of the scope of this tutorial, but basically we’ve styled the modal to be fixed at the bottom of the page with a maximum height of 20% of the viewport height. The “X” button lies to the right of the modal. The modal is set to be hidden initially.
Attaching Event Handlers
Now, we want to setup our script to grab data only when we mouseover each “Story”. In your browser, go to the Github explore page and right click on any repository tile. Click on “inspect” on the right-click context menu. This should bring up the dev tools window. As you mouse over DOM elements, a blue overlay will appear over the element on the webpage you’ve moused over. This technique is extremely useful for finding the correct elements where you want to attach event handlers or inject HTML.
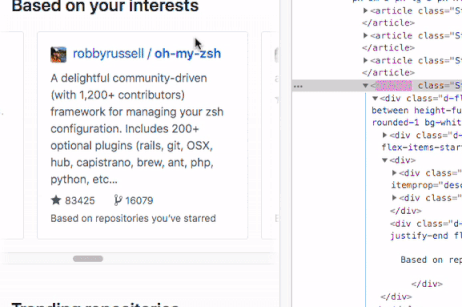
Inspecting an HTML element in Chrome Devtools
A small speech bubble will also show you the HTML class of the element you just hovered over. In this case, we see that a tile belongs to the .Story class. We now select this class of elements using jQuery and specify the behavior when we mouse hovers over the element.
 1// ...
 2
 3let $stories = $('.Story');
 4var timer;
 5
 6function init() {
 7    // ...
 8    setupMouseHandlers();
 9}
10
11function setupMouseHandlers() {
12    $stories.mouseenter(function() {
13        timer = setTimeout(function() {
14            // Retrieve data here
15            alert("Moused over!");
16        }, 1000);
17
18    }).mouseleave(function() {
19        clearTimeout(timer);
20    });
21}
Hover over any .Story tile to see the alert popup.
NOTE: I’ve added some timers to cause the alert to be shown after hovering over a .Story for a second. Without them, you’ll notice that the alert will show constantly if you accidently mouse over a .Story tile while browsing the page.
We also need to setup a click handler to the “X” button which will hide the modal.
1function setupMouseHandlers() {
2    $close.click(function() {
3        $modal.hide();
4    });
5    //...
6}
Pulling the README file from Github
Looking at the Github content API, we see that we need the owner and repository name to get the contents of the README file of a repository.
Luckily, we can get this by parsing the title of each .Story tile since the title is in the format of ‘[owner]/[repository]’.
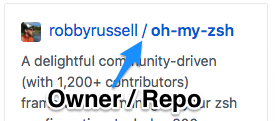
Getting the owner/repo of a tile
If you use dev tools once again to examine the Story tile, you’ll see that a couple layers down the href of an anchor tag contains exactly the data we need. To illustrate, I’ve provided a snippet of what the HTML structure of a tile looks like below.
1<article class="Story">
2    <div>
3        <h1>
4            <a></a>
5            <a href="owner/repo"></a>
6        </h1>
7    </div>
8</article>
We can use a combination of regex and jQuery to drill down to find this element and strip out this data.
1// ...
2timer = setTimeout(function() {
3    let href = $this.find('div > div > h1 > a').last().attr('href');
4    let re = /^\/(.+)\/(.+)$/;
5    let [_, owner, repoName] = href.match(re);
6    alert(`${owner}, ${repoName}`);
7}, 1000);
8// ...
Paste the code above into our timer code and you should see the owner and repository name in the alert when you hover over a story tile.
Now we can perform a GET call to the Github API using jQuery.
 1function displayReadme(owner, repoName) {
 2    $.get({
 3        url: `https://api.github.com/repos/${owner}/${repoName}/readme`,
 4        dataType: 'JSON',
 5        success: function(data) {
 6            // Convert from base64
 7            let markdown = atob(data.content);
 8            // Strip html
 9            let strippedString = markdown.replace(/(<([^>]+)>)/ig,"");
10            $modalContent[0].innerText = strippedString;
11            $modal.show();
12        }
13    });
14}
The Github API notes that the returned README data will be encoded in base64 so we have to make sure to decode the data using the built-in JavaScript function atob(). In addition, some README’s contain HTML for embedding images and videos, I’ve stripped these away with the help of some regex that I acquired from css-tricks.com.
Now, If you mouse over a tile, the contents of the README should be shown in the modal below. You can click the “X” at the top right hand corner to close the modal.
Using these set of simple techniques you can modify any webpage to do what you want. The obvious shortcomings of this technique is that if the owners of the webpage ever change the site, your script will break. Due to the nature of these plugins, it is often difficult to debug.
Even so, Greasemonkey is a valuable tool. It can be used to reduce monotonous tasks, simplify workflows and improve productivity.
Let me know in the comments below what your favorite Greasemonkey scripts are.